

Are you tired of spending ages measuring and pinning your hems before pressing? We hear you. We’ve got a couple of tricks up to share with you to make this process faster and more efficient for garments without a full lining or a zipper to the bottom.
Staight as an Arrow: Tips for Hemming with Precision
We will take you through time, from old school to more modern sewing on hemming. The third and final method is the fastest and neatest.
First things first, you’ll need to know your hem allowance. This is usually printed on the pattern or found in the directions. Intermediate to advanced sewists will be able to change hem allowances, but perhaps they haven’t found time to look into ways to refine their hemming skills. Perhaps some intermediates are still just double folding the hem with a straight stitch and hoping for the best every time. Let’s see if we can improve that!
Technique 1: Old School Basting Stitch for Hemming
This is a slow and methodical way to hem a woven, but it is good for curved hems that change along the hem. This is because seeing and sewing the curve whilst you sew is a bit challenging for beginners. It’s best to measure and mark with a basting line first.. alternatively you could mark with tailors chalk.
Garment wrong sides out.. Take the area to be hemmed and do a basting stitch along the edge using the longest stitch on your machine, usually a 4.5 or 5.0 mm stitch. The basting stitch should be the same distance away from the raw edge as the hem allowance amount. For example, if your hem allowance is 1 inch, then you should be basting 1 inch away from the edge as well. Use the grid plate on your sewing machine as a guide as you baste. Measuring and seeing as you baste.
Now, take the fabric to your ironing board, fold the raw edge of the folded hem to the baste line, and iron the hem fold all along the circumference of the garment to create a folded hemline.
You will be sewing just outside the basting stitch, an 1/8 of an inch or 4-5 mm away from the basting stitches, nearer and toward the folded finished hem edge. Straight stitch around using your stitches as a guide.
No measuring is needed because you already did this.
Beginners may like to pin as they go. Intermediates can usually hem a woven without pins if the iron edge is crisp and clear.
Note: There is redundancy with this technique, both basting and pins.
Then stitch in place, sewing on the top folded edge nearest the inside of the garment. To finish, you can use a seam ripper to remove the original basting stitch, and you’re done.
Technique 2: Hem Gauge Method for Hemming
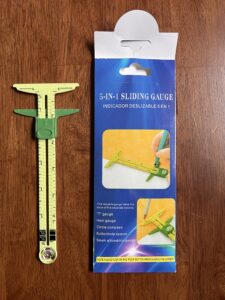
If you’re like us and hate removing basting stitches, then you can try the Hem Gauge Technique. You can either buy a Hem Gauge or make your own using cardstock or cardboard. Using a ruler, mark up common measurements you think you’ll use when folding. For now, we’ll make lines at ¼”, ½”, and 1”.
Looking at the wrong side of the fabric, place your Hem Gauge on the fabric, folding the fabric over until the raw edge hits your desired line on the Hem Gauge. Then press the fabric, moving the Hem Gauge along the fabric edge until you’ve done the whole thing. The Hem Gauge will give you the measuring stability you need to get a crisp, accurate fold.
Note for Hem Gauge Use: On the image below the top edge of the yellow is the beginning measuring point and the top edge of the green is the other mark of the measuring point. The distance between the two in this example is 1 inch.

For example, if you did 1/2” for the first part, to finish, you can repeat the process but this time bringing the fold of the fabric to the one inch line, making your total hem allowance 1”. Press and stitch into place.
Both of these techniques will give you a similar look and work best for straight edges. Plus, they’ll save you time when it comes to folding and pressing. So, next time you’re hemming, give the Hem Gauge Technique a try and see how much easier your life can be!
Neatest and Fastest Hems with a Seam Guide Presser Foot
Narrower and neater hem lines can be achieved using a seam guide presser foot on your machine. We explain how to do this with a double fold method. We used our Blind Hem Presser foot with a straight stitch.
- Change the Presser Foot and Needle Position: In order to do this on your machine, be sure your needle placement will not hit the presser foot causing the needle to break. Nudge the placement and test this slowly and manually with the hand wheel on the side of your machine before going at regular speed.
- Fold your hem halfway to your end desired hem allowance. Iron in place all around the circumference, folding open flat the side seams as you go. Use the hem gauge for assistance.
- Fold again and iron all around one more time. Cover the raw edge of the first fold.
- Position your fabric under the seam guide presser foot (blind hem) with the guide 1/8″ or 3-4 mm away from the inside folded edge of the hem.

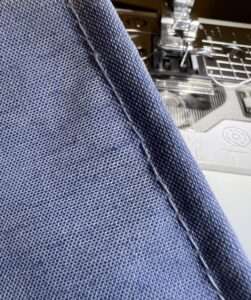
5. Straight stitch around the circumference being careful to watch the needle to stay to the right of the fabric fold and catch the fold in the stitch. Beginners should go slowly. Below is the finished look on the wrong side of the garment.

Below is the finished look on the right side of the garment.
> Click here for more sewing tips and tricks
>> Click here to purchase our 125+ patterns for one time price of $67
Recent Posts
You read that right. A custom sewing pattern — designed exclusively for you by a professional flat pattern designer. Not a discount. Not a coupon. Your pattern. Your name on it. That’s what...
What Is a Hong Kong Seam? (And How to Sew This Couture Finish Step-by-Step)
Learn how to sew a Hong Kong seam finish step-by-step. This couture bias-bound technique gives unlined garments a clean, professional interior.